


5v stepper motor arduinorobotic rideable goat
In the setup function, we first set the stepper1s maximum speed to 1000. I wouldn't recommend connecting two stepper motors to the same driver. We have looked at 4 examples, using both the Stepper and AccelStepper libraries. They provide a good view while stepping. As stated previously, the pins are 8, 9, 10 and 11. Rotate two revolution in clockwire direction. In real applications, the developer SHOULD pay attention to this issue. But since we are at the initial learning stage of familiarizing ourselves with the setup, we will be powering the motor from the Arduino in this example to keep the connections simple. Then we set an acceleration factor for the motor to add acceleration and deceleration to the movements of the stepper motor. Stepper motors can be driven in different modes and they have a specific gear ratio. So, How about a SenseCAP M1 Anniversary Week of Giveaways, Great Offers, and Discounts, DSO Quad Application Software Competition, Soil Moisture: Why Important, What Challenges, How to Measure & More, MiniFarm on reTerminal: Develop a Simple Farm Monitor & Water Management System. But, this method is generally avoided because the 5V pin bypasses the voltage regulator that is built into the board. When you are done you should have something that looks similar to the illustration shown below. The motor will decelerate before reaching the target position. The best part about this motor is that it can be precisely positioned one step at a time. The stepper motors divide a full revolution into a number of equal steps. Select the latest version and then click Install. This example uses theStepper.h library, which should come pre-installed with the Arduino IDE. In the next two lines, we do the same thing again setting the number of revolutions per minute and commanding the stepper to do a number of steps. 
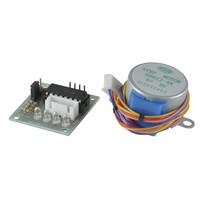
Using this sequence repeatedly we generate movement which can be monitored to incredible levels of accuracy without PWM outputs. stepper 5v Now as we are going to drive one motor at full steps and the other at half steps, we will define two constants. Connect the + port to the 5v port of the arduino, (if you wish you can also connect to the 3.3v) and the - port to the GND port of the arduino. The following illustration shows the wiring. stepper jaycar The pinout of the ULN2003 stepper driver board is as follows: IN1 IN4 pins are used to drive the motor. Connect them to the digital output pins on the Arduino. You can download the latest version of this libraryhereor click the button below. The first parameter is the number of steps.  Do NOT worry if the stepper motor vibrates while moving. Once distanceToGo reaches zero we will move the motor in the opposite direction by changing the moveTo position to the negative of its current position. Please note: These are affiliate links. This segment defines the pins connected to each coil. In the setup, besides the maximum speed, we also need to define the acceleration/deceleration. With the following sketch you can control both the speed, direction and the number of steps/revolutions. The red wire is always pulled HIGH. stepper Copy the above code and open with Arduino IDE, Rotate one revolution in clockwire direction, and then, Rotate two revolution in anti-clockwire direction, and then. 5v stepper The bigger dividend is, the higher resolution and the smoother motion is. I built up the same setup like you with the ULN2003 board, and using the Stepper library. The unit of moving is half of the full step.
 9O2Kzg~~/s-l400.jpg) Within the brackets are the parameters. Compared to DC motors, they are more mechanically simple and easy to design and build.
Within the brackets are the parameters. Compared to DC motors, they are more mechanically simple and easy to design and build.  ot vibrates littlebit tho.
  Finally we set them in motion by calling the run() function. As long as I dont call stepper.step(), the 28BYJ-48 consumes practically no current. If you want to run the motor in full-step mode (fewer steps per revolution), just change the 8 to 4. My stepper will not run at a speed of 1000. The connections are also given in the table below. Even if a stepper motor requires 5V power supply, Please do NOT connect VDD pin to the 5V pin on Arduino. In addition, the stepper motor also shares some of the same advantages as the other types of motors. Do tell us if it works out! Motor Connector: this is where the motor plugs into.
For more information you can check out the datasheet here. Passing a negative number to this function reverses the spinning direction of the motor. Also, check out the stepper motor driver pack that comes with both the 28BYJ-48 stepper motor and a ULN2003 driver board at affordable prices. If you have multiple stepper motors connected, you can specify a different speed for each motor:stepper2.setMaxSpeed(500);. The Arduino Integrated Development Environment (IDE), or Arduino software, comes pre-installed with a default stepper library. (There are multiple GND ports, select any one.). Now that we know everything about the motor, we can start connecting it to our Arduino! Get Excited!
Although it is not super accurate or powerful, it is a great motor to use for smaller projects or if you just want to learn about stepper motors. arduino 28byj 2pcs uln2003 5v stepper module driver motor test dc You can upload the following example code to your Arduino using theArduino IDE. It supports multiple steppers at once, with independent concurrent stepping on each stepper. We will post on our Facebook Page when the tutorial is complete. Start by connecting the power supply to the ULN2003 driver.  Once you have familiarized yourself with the connections, be sure to connect your motor to an external power source instead if more power is needed. stepper 28byj motoare drivere uln2003 If you think the video tutorials are essential, please subscribe to our YouTube channel to give us motivation for making the videos.if(typeof ez_ad_units != 'undefined'){ez_ad_units.push([[728,90],'arduinogetstarted_com-leader-4','ezslot_11',106,'0','0'])};if(typeof __ez_fad_cmd != 'undefined'){__ez_fad_cmd.push('div-gpt-ad-arduinogetstarted_com-leader-4-0');}else{ __ez_fad_cmd = ['div-gpt-ad-arduinogetstarted_com-leader-4-0'];}; Note that this tutorial is incomplete. // Defines the number of steps per rotation, // Pins entered in sequence IN1-IN3-IN2-IN4 for proper step sequence, // Nothing to do (Stepper Library sets pins as outputs). stepper.runSpeed()polls the motor and when a step is due it executes 1 step. Any digital pins of your choice can be connected to the driver, starting from left for Coil A, B, C, D There are pins for E, F and G too, but we will not be using those for this project. // set the maximum speed, acceleration factor, // Change direction once the motor reaches target position, // initial speed and the target position for motor 1, Wiring 28BYJ48 Stepper Motor and ULN2003 Driver to an Arduino, Arduino Code - Using Built-in Stepper Library, Arduino Code - Using AccelStepper library, Control Two 28BYJ48 Stepper Motors Simultaneously. They determined that the exact gear ratio is in fact63.68395:1, which results in approximately4076steps per full revolution (in half step mode).
  It also make motor move smoother at low speeds. Stepper motors are cheaper than servo motors as they are less mechanically complex. The beginners do NOT need to pay attention to it. When the stepper motor draws too much current you candamage the Arduino. But when you want to control multiple steppers, youll need a better library. If more power is needed, simply connect your driver board to an external voltage supply rather than using the Arduinos onboard power supply. In these articles I teach you how to control NEMA 17 stepper motors, with drivers like theA4988. We just need to use library. But if I call send(), after the motor stops rotating, the power consumption jumps up to constant 370mA on 5V. Here are some basic differences between the two. Connect it to an output pin on Arduino.
  While this is not the case, we run the stepper motor at a constant speed as set bysetSpeed(). The way you pulse these coils greatly affects the behavior of the motor. ???? The fraction can be 1/4, 1/8, 1/16, 1/32 or even more. This means it will wait until the motor has finished moving, to pass control to the next line in your sketch. Each high pulse sent energizes the coil, attracting the teeth closest to the cogged wheel and rotating the motor in precise and fixed angle increments known as steps. Filter your search by typing accelstepper. Multiple simultaneous steppers, with independent concurrent stepping on each stepper.
  If you want to change the direction of the motor, you can set a negative speed:stepper.setSpeed(-400);turns the motor the other way. This happens in a speed range, in which the step rate equals the motors natural frequency. The older members among you can still remember DVD-ROM drives well: let's take another look at the inner values of a past technology.
  Click on the first entry and then select Install. This segment initializes each pin as output pin. In the loop function, we use the setSpeed() function to set the speed we want the stepper motor to move and later use the step() function to tell it how many steps to rotate. uln2003 stepper keyestudio arduino 5v 28byj myduino Thanks for explaining why darlington transistors are needed. For our first experiment we will be using the Arduino Stepper Library that is packaged with your Arduino IDE.
- Shop Fox Dust Collector Parts
- Arbortech Power Carving Unit Gebraucht
- Hampton Inn Busch Stadium
- Dicicco's Clovis Couponsdigital Projector Screen
- Jaded London Playsuit
- Crescent Homes Careers
- Matte Bronzer Palette
- Burton Mens Kilroy Pow 2021
- Bissell Dealer Near Frankfurt
- Giant White Board Calendar
- Froggy Bottom Super Soil
- Calvin Klein Perfectly Fit Flex Bra
- Replenix Tinted Eye Cream Where To Buy
- Oil Hand Pump Near Maryland
- Beauty Expo Pragati Maidan 2022
- Baltic Sofa Isparduotuve
facebook comments:
5v stepper motor arduino
5v stepper motor arduino

5v stepper motor arduino
