


toilet water supply valve replacementrobotic rideable goat
In most cases, you will turn the water shutoff valve clockwise to turn it off. Monster & Master Brass Angle Stop Valve Shut Off Quarter Turn Water Sink Bathroom Toilet Kitchen Shower Plumbing (5 PC-1/2"NOM In x 3/8"COMP Out), ATHUS-MS-FV-001S, Fluidmaster 400CR Universal Toilet Fill Flapper Repair Kit for 2-Inch Flush Valves, 1-Pack, Multicolor, Fluidmaster 400H-002 Performax Universal Toilet Fill Valve High Performance Tank and Bowl Water Control, 1-Pack, Multicolor, Korky 528MP QuietFILL Platinum Fill Valve-Fits Most Toilets-Easy to Install-Made in USA, Universal 99%, Black, SharkBite 1/2 x 3/8 Inch Compression Angle Stop Valve, Quarter Turn, Push to Connect Brass Plumbing Fitting, PEX Pipe, Copper, CPVC, PE-RT, HDPE, 23036-0000LF, Complete Toilet Set Valve 1/2 in. Turn the water back on at the main and check the new valves for leaks. Ok, youre all excited to start your plumbing project, replacing your vanity! The goal is that the float comes up and shuts off the water before the water gets high enough to flow over the top of the overflow pipe. The best fill valves offer anti-siphon protection. If the water levels arent the same (you can tell from the lines on the side of the tank), then youll need to adjust the adjustment clip or screw that maintains the level of the float cup. The project shown here involves replacing only the fill valve, a relatively easy job that can be done with the toilet tank in place. Your email address will not be published. The valve assembly includes the float and a shut-off mechanism to stop the flow of water. Pushed it into position and hand tightened the nut. You may need to use an adjustable wrench. Measure the new base against the old base. The fill valve is the device that controls the flow of fresh water into the tank of your toilet. All going ok except I cut off the soldered on connection as per normal. {"smallUrl":"https:\/\/www.wikihow.com\/images\/thumb\/6\/6f\/Replace-a-Toilet-Fill-Valve-Step-1.jpg\/v4-460px-Replace-a-Toilet-Fill-Valve-Step-1.jpg","bigUrl":"\/images\/thumb\/6\/6f\/Replace-a-Toilet-Fill-Valve-Step-1.jpg\/aid9338959-v4-728px-Replace-a-Toilet-Fill-Valve-Step-1.jpg","smallWidth":460,"smallHeight":345,"bigWidth":728,"bigHeight":546,"licensing":"
License: Creative Commons<\/a> License: Creative Commons<\/a> License: Creative Commons<\/a> License: Creative Commons<\/a> License: Creative Commons<\/a> License: Creative Commons<\/a> License: Creative Commons<\/a> License: Creative Commons<\/a> License: Creative Commons<\/a> License: Creative Commons<\/a> facebook comments:
\n<\/p>
\n<\/p><\/div>"}, {"smallUrl":"https:\/\/www.wikihow.com\/images\/thumb\/e\/e0\/Replace-a-Toilet-Fill-Valve-Step-2.jpg\/v4-460px-Replace-a-Toilet-Fill-Valve-Step-2.jpg","bigUrl":"\/images\/thumb\/e\/e0\/Replace-a-Toilet-Fill-Valve-Step-2.jpg\/aid9338959-v4-728px-Replace-a-Toilet-Fill-Valve-Step-2.jpg","smallWidth":460,"smallHeight":345,"bigWidth":728,"bigHeight":546,"licensing":"
\n<\/p>
\n<\/p><\/div>"}, {"smallUrl":"https:\/\/www.wikihow.com\/images\/thumb\/e\/e6\/Replace-a-Toilet-Fill-Valve-Step-3.jpg\/v4-460px-Replace-a-Toilet-Fill-Valve-Step-3.jpg","bigUrl":"\/images\/thumb\/e\/e6\/Replace-a-Toilet-Fill-Valve-Step-3.jpg\/aid9338959-v4-728px-Replace-a-Toilet-Fill-Valve-Step-3.jpg","smallWidth":460,"smallHeight":345,"bigWidth":728,"bigHeight":546,"licensing":"
\n<\/p>
\n<\/p><\/div>"}, {"smallUrl":"https:\/\/www.wikihow.com\/images\/thumb\/1\/1f\/Replace-a-Toilet-Fill-Valve-Step-4.jpg\/v4-460px-Replace-a-Toilet-Fill-Valve-Step-4.jpg","bigUrl":"\/images\/thumb\/1\/1f\/Replace-a-Toilet-Fill-Valve-Step-4.jpg\/aid9338959-v4-728px-Replace-a-Toilet-Fill-Valve-Step-4.jpg","smallWidth":460,"smallHeight":345,"bigWidth":728,"bigHeight":546,"licensing":"
\n<\/p>
\n<\/p><\/div>"}, {"smallUrl":"https:\/\/www.wikihow.com\/images\/thumb\/9\/92\/Replace-a-Toilet-Fill-Valve-Step-5.jpg\/v4-460px-Replace-a-Toilet-Fill-Valve-Step-5.jpg","bigUrl":"\/images\/thumb\/9\/92\/Replace-a-Toilet-Fill-Valve-Step-5.jpg\/aid9338959-v4-728px-Replace-a-Toilet-Fill-Valve-Step-5.jpg","smallWidth":460,"smallHeight":345,"bigWidth":728,"bigHeight":546,"licensing":"
\n<\/p>
\n<\/p><\/div>"}, {"smallUrl":"https:\/\/www.wikihow.com\/images\/thumb\/6\/63\/Replace-a-Toilet-Fill-Valve-Step-6.jpg\/v4-460px-Replace-a-Toilet-Fill-Valve-Step-6.jpg","bigUrl":"\/images\/thumb\/6\/63\/Replace-a-Toilet-Fill-Valve-Step-6.jpg\/aid9338959-v4-728px-Replace-a-Toilet-Fill-Valve-Step-6.jpg","smallWidth":460,"smallHeight":345,"bigWidth":728,"bigHeight":546,"licensing":"
\n<\/p>
\n<\/p><\/div>"}, {"smallUrl":"https:\/\/www.wikihow.com\/images\/thumb\/2\/26\/Replace-a-Toilet-Fill-Valve-Step-7.jpg\/v4-460px-Replace-a-Toilet-Fill-Valve-Step-7.jpg","bigUrl":"\/images\/thumb\/2\/26\/Replace-a-Toilet-Fill-Valve-Step-7.jpg\/aid9338959-v4-728px-Replace-a-Toilet-Fill-Valve-Step-7.jpg","smallWidth":460,"smallHeight":345,"bigWidth":728,"bigHeight":546,"licensing":"
\n<\/p>
\n<\/p><\/div>"}, {"smallUrl":"https:\/\/www.wikihow.com\/images\/thumb\/0\/06\/Replace-a-Toilet-Fill-Valve-Step-8.jpg\/v4-460px-Replace-a-Toilet-Fill-Valve-Step-8.jpg","bigUrl":"\/images\/thumb\/0\/06\/Replace-a-Toilet-Fill-Valve-Step-8.jpg\/aid9338959-v4-728px-Replace-a-Toilet-Fill-Valve-Step-8.jpg","smallWidth":460,"smallHeight":345,"bigWidth":728,"bigHeight":546,"licensing":"
\n<\/p>
\n<\/p><\/div>"}, {"smallUrl":"https:\/\/www.wikihow.com\/images\/thumb\/5\/58\/Replace-a-Toilet-Fill-Valve-Step-9.jpg\/v4-460px-Replace-a-Toilet-Fill-Valve-Step-9.jpg","bigUrl":"\/images\/thumb\/5\/58\/Replace-a-Toilet-Fill-Valve-Step-9.jpg\/aid9338959-v4-728px-Replace-a-Toilet-Fill-Valve-Step-9.jpg","smallWidth":460,"smallHeight":345,"bigWidth":728,"bigHeight":546,"licensing":"
\n<\/p>
\n<\/p><\/div>"}, {"smallUrl":"https:\/\/www.wikihow.com\/images\/thumb\/1\/1d\/Replace-a-Toilet-Fill-Valve-Step-10.jpg\/v4-460px-Replace-a-Toilet-Fill-Valve-Step-10.jpg","bigUrl":"\/images\/thumb\/1\/1d\/Replace-a-Toilet-Fill-Valve-Step-10.jpg\/aid9338959-v4-728px-Replace-a-Toilet-Fill-Valve-Step-10.jpg","smallWidth":460,"smallHeight":345,"bigWidth":728,"bigHeight":546,"licensing":"
\n<\/p>
\n<\/p><\/div>"}. Depending upon your comfort level withdiy projects, you might decide to call a plumber, but here at vipHomeLink, we believe you can fix this issue. Start by taking off the cover and flushing the toilet. If you dont have a bucket, lay down your worst towel. (Your replacement kit should come with a few different color connectors. (Toilets have shut off valves on the side. Dont forget to attach the refill tube to the top of the overflow pipe. Does tightening with a wrench crimp the nut making it bulge thus tightening around the pipe to prevent it from being pulled off? wikiHow marks an article as reader-approved once it receives enough positive feedback. He specializes in estimating as well as design and engineering for plumbing systems, and he works for one of New York's largest union plumbing construction companies. Richard Epstein is a licensed master plumber with over 40 years experience in residential and commercial plumbing. materials: (1) Colony 1.6 GPF Elongated Two-Piece Toilet bowl and tank White ( QTY 300 UNIT). ), (Water damage isa bigger expense than the toilet part and can lead to more issues, like mold growth.).
Please revert back to me with all relevant information, options, and suitable alternatives. COPYRIGHT 2022 PLANITDIY.COM. Congrats! Youre seeing this ad based on the products relevance to your search query. If you need to adjust the height of the valve, press up on the lock ring to disengage it and turn the shank to adjust the fill valve to the proper height. Note: In addition to the above,Our company standard Payment terms is Net 30 from the date of supplier with your supplier Invoice.Kindly Send your company credit application form alongside with the quote price for the product above. It should make a smooth bend (with no kinks) when connected to the overflow tube. Lift the valve assembly from the tank (and watch as water from the tank falls into your bucket or onto the towel). ALL RIGHTS RESERVED. Should tightening nut with a wrench result in the nut becoming solidly in place and preventing it from slipping off? Learn more home improvement and maintenance tips in our vipTIPS, exclusive to our vipHomeLink members. If you have a DIY home repair, maintenance or improvement question for Norma, now is your chance to ask-the-expert and have her answer.
O.D X 3/8" Comp X 3/8" Comp 1/4 Turn Double Handles Chrome Brass Angle Stop Valve Water Shut Off Ball Valve For Water Pipes Lead Free,For Faucet Toilet Valve ,Dishwasher,Filter (1), LASCO 06-9211OB Angle Stop Quarter Turn Ball Valve, 5/8-Inch OD Compression Inlet X 3/8-Inch OD Compression Outlet, Dark Oil-Rubbed Bronze, Fluidmaster 400CAR3P5 PerforMAX Adjustable High Performance Toilet Fill Valve and Flapper Repair Kit, For 3-Inch Flush Valve Toilets, Eastman 1/2 Inch FIP x 3/8 Inch OD Compression Multi-Turn Angle Stop Valve with Brass Stem, Brass Plumbing Fittings, Chrome, 10809LF, Toilet Fill Valve, High Performance Toilet Repair Kits, Easy to Install and Fast Fill Universal Toilet Replacement Parts, Eastman 48311 Braided Stainless Steel Toilet Installation Kit with Multi-Turn Stop Valve, 3/8 inch Comp x 7/8 inch BC, 12 inch, Toilet Fill Valve High Performance Toilet Replacement Part, Adjustable Water Line and Height, Fits Most Toilet Tank, Easy Install, Universal Silent Fill Valve, BrassCraft Mfg PSB52X Shut Off Valve x Compression-Angle, Chrome, Toilet Flush Valves 2-Inch Replacement Valve Kit Assembly for One Piece Dual Flush Drain Valve Repair Compatible with TOTO THU338N, R&T A2422M 3" Dual Flush Valve with Push Button Dual Flush Toilet Repair Kit Toilet Tank Parts Replacement for 2-piece Toilet, MIDLINE VALVE 81212QS-OM Water Supply Stop Valve with Quarter Turn Wheel; Lead Free; One Piece Design; Angle Shut-off for Toilet, Sink, Dishwasher; 1/2 in. Look inside the tank. Insert the valve into the hole in the bottom of the tank and tighten the nut on the outside. Any offers that appear on the vipHomeLink site, in our content, vipTIPs or other recommendations are for the convenience and benefit of our users. Inside the toilet, youll want to remove the refill tube attached to the overflow pipe on the flush valve. Turn on the water supply valve all the way, and watch as the toilet tank refills with water. You can get rid of any excess water by using a turkey baster, wet-dry vacuum, or old towels. Your toilets valve assembly should show up in the results with the serial number. Mountain View CA 94043 If youre not sure where to find your local store, check out our Store Locator. Then insert the fill valve into the hole in the bottom of the tank. If water is flowing out the top of the cap, this is a problem. Hello, ", http://www.homedepot.com/c/replace_toilet_fill_valve_guide_HT_PG_PL, https://www.thisoldhouse.com/how-to/how-to-rebuild-toilet-tank, https://www.familyhandyman.com/plumbing/toilet-repair/parts-of-a-toilet/view-all/, https://www.plumbingsupply.com/how-to-replace-fill-valve-fluidmaster-400a.html, changer le tube de remplissage des toilettes. This washer will provide an inner seal that prevents leaking around the base of the fill valve. cleaned and later replaced the Kohler Genuine Part GP1083167 using the silent fill valve kit. When positioned correctly, the top of the float should be set at about 1 inch (2.5cm) below the top of the overflow pipe. Keep a towel on hand or on the floor below the opening to catch any water that comes out. The tank should fill to a marked water line on the inner walls of the tank; the water level should be about one inch below the top of the overflow tube. The good Lord knows Im never about discouraging folks from attempting projects, I just want people to make informed decisions about what projects to choose and what challenges they may face. Tighten the metal washer. % of people told us that this article helped them. Connect and Make Adjustments to the Fill Valve, Learn How to Remove and Replace Your Toilet Without Calling a Plumber, Replacing the Flapper Fixes a Running Toilet, Some Toilet Problems Are Easy to Fix Yourself, Fix a Leaky Toilet Flush Valve Using a Repair Kit, How to Adjust the Water Level in a Toilet Tank, The Right Way to Install a Kohler Highline Toilet, Need Help Renovating Your Bathroom? You may need to cut the rubber tubing with scissors if it's too long. toilet plumbing repair parts Then remove the old fill valve by removing the lock nut beneath the tank.

You may need to use an adjustable wrench or a pair of channel locking pliers to loosen the connection. "Article pretty much gives a blow-by-blow account of how to replace toilet fill valve. This part is sometimes known as a ballcock, so named after a design that was once the standard. Also give a list of things, "A good checklist. Reattach water supply tube or hose to tank. ), Easier said than done we know, but this is a relatively easy task that shouldnt take more than 15 minutes. Just one problem. Next, disconnect the water supply line from the tank. A shop vac also works well. Here, for example, changing out a vanity would be intermediate to advanced, replacing a shutoff valve, basic to intermediate, depending on the type of shutoff. Start by turning off the water supply to the toilet. My water is shut off making my family miserable at me until I solve this and am able to turn the water back on. PlanItDIY also provides a place for consumers to help each other with DIY projects through an online community. You may need to tighten them slightly more if there is any seepage. Brass Threaded Ball Valve Full Port. When you look at it together off the pipe the ring and nut look smooth as though one cylinder. Um Wheres Gamora? Position the handle for easy access. Clean the valve with these quick steps: If the toilet tank fills normally, way to go! By clicking Accept All Cookies, you agree to the storing of cookies on your device to enhance site navigation, analyze site usage, and assist in our marketing efforts. Before you visit your local independent home improvement retailer to pick up your new fill valve, heres something you should know. 500 East Middlefield Road Be aware, though, that if you go this route, it will require you to temporarily remove the entire tank. Take a look at the fitting below the shutoff valve. toilet valve shut water supply replace bathroom replacement sink repair Regardless of your building codes, installing an anti-siphon valve is a good idea. Fix-It Friday is an exclusive Women You Should Know editorial series authored by seasoned veteran of home improvement, Norma Vally, the former host of Discovery Home Channels series Toolbelt Diva and a show on Sirius Satellite Radio by the same name. Next, attach the corresponding connector to the assembly. Your email address will not be published. Adjust the height of the fill valve, if necessary. Step 1. You can use a sponge or a towel to get the rest of the water out. intelligent homeowner who has made this repair in the past, but it's been 20 - 30 years, so a quick tutorial was very valuable. Reconnect the water supply tube to the fill valve. It will either be a soldered connection, a screwed on fitting, or a compression fitting. The weekly column is designed to inspire women weekend warriors, aspiring handywomen, and even seasoned DIYers to take on home repairs and maintenance projects with confidence and gusto. Josh Roger Thanks to all authors for creating a page that has been read 173,873 times. Shut off water by turning the shut-off valve clockwise. Heavy Duty 1/4 Quarter Turn Angle Shut Off Valve Squared Body 1/2 in. Beneath the tank, loosen the lock nut that holds the fill valve to the tank. By signing up you are agreeing to receive emails according to our privacy policy. Let me give you an example. Place the shank washer over the threads of the shank on the new valve, flat side up. porcher toilet veneto piece parts guillens replacement regarding valves question control fill had water standard american If you elect to use or purchase services from third parties, you are subject to the third parties review of your information and to their terms and conditions and privacy policy. "This article really aided my comfort/confidence level in going forward with my project! Water will forcibly shoot up and into the cup. If the fill valve is malfunctioning on an older 3.5-gallon (13.25-liter) flush toilet, consider replacing the toilet with a 1.5-gallon (5.67-liter) model. Subscribe now to vipHomeLink with a monthly or annual membership.
500 East Middlefield Road First, lay a garbage bag down under the valves opening and put a bucket on top of it. Looks like the right size. Locate this first and label it if it isnt already). Grab two plastic cups, one filled with vinegar. Use an adjustable wrench to snug this connection. Slide the compression ring over the water line (unless using the old one see step 2 for compression fittings). COMP; Chrome Plated Brass, Square Angle Stop Valve Brass Black Finish G1/2"Shut Off Valve For Bathroom Toilet Bidet Shower, Eastman 10755LF Quarter-Turn Straight Stop Valve, 1/2 inch FIP x 3/8 inch OD Comp, Chrome, ForeverPRO DFVFVK Universal Water Saving Dual Flush Valve and Fill Valve with Push Button Toilet Repair Kit Fits Standard 2 inch Drain, Bidet T Adapter,T Adapter with Shut-off Valve,T Adapter 3-way 7/8" 16/15"1/2" Tee Connector T Adapter for Bidet,T Adapter Valve for Handheld Toilet Bidet Spray, Minimprover Chrome Plated Heavy Duty Brass 3-way 360 Angle Stop Valve,1/2"FIP Inlet x 3/8"OD Compression x 3/8"OD Compression,Supply Valve Dual Outlet Valve, (10-Pack) Cyrret Angle Stop Shut off Valve 1/4 Quarter Turn 1/2-Inch FIP Inlet X 3/8-Inch OD Outlet, Lead Free Brass Chromed, CUPC NSF AB1953 Approved, Pronese 2 Pack Lead-Free Brass Multi-Turn Angle Stop Valve With Chrome-Plated Handle,1/2"FIP Inlet x 3/8"OD Compression, Easy Installation In Water Supply Line Like Toilets, Dishwashers, Ice-makers. You may need to reach down into the tank from the top and grip the bottom of the fill valve with another set of pliers to keep it from rotating as you loosen the mounting nut. Take note of the color of the connector on the side of the valve. Set the fill valve into the toilet tank, inserting the tailpiece through the opening in the bottom of the tank. If you had any difficulties during this process, contact a professional plumber. If you have hard water, you might have some sediment stuck in the valve. If the valve is leaking under the tank, tighten the connections. Youve now replaced the water valve assembly. First, were going to tell you how to clean the valve, and if that doesnt work, were going to help you replace the water valve assembly in your toilet tank. Youll never get a glimpse of that kind of heads up in a TV spot!
Here's How to Remove a Toliet, Replacing the Faucet for Your Utility Sink, How to Easily Install the Ikea Dalskar Faucet in Your Bathroom, Flush Problems Are Often Caused by Flapper Problems, Toilet Repair: Fixing Tower or Canister Style Flush Valves, How to Install a Two-handle AquaSource Bathroom Faucet. After viewing product detail pages, look here to find an easy way to navigate back to pages you are interested in. 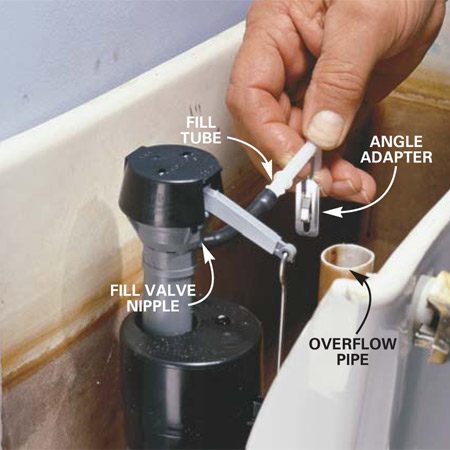 These parts also go bad eventually, and if you want to do a maintenance upgrade, you can buy a kit that includes both the fill valve and flush valve assemblies. As you unscrew the nut, a bit of water may drip out of the tank. Over time, the valve simply wears out and must be replaced. Fix-It Friday is an exclusive Women You Should Know editorial series authored by seasoned veteran of home improvement. Top subscription boxes right to your door, 1996-2022, Amazon.com, Inc. or its affiliates. So without further ado, heres how to replace a water shutoff valve. Slide the rubber washer included with the kit onto the bottom flange on the fill valve tailpiece.
  Detach the valve and put the new valve in its place, remembering to clip it to the overflow pipe.
But if the valve continues to spew water from under the cap, youll need to replace the valve assembly. suitable alternatives. Then place a different cup upside down over the open valve and turn the water back on. It does not take a lot of experience with plumbing or a lot of time. Take the washer off the bottom of the cap and place it in the cup with vinegar. Once again, hand-tighten first and then use pliers to tighten a little more. Different valves have different methods of doing this, but with most, it's a simple matter of screwing the stem piece shorter or longer so the overall length of the fill valve will fit inside your toilet tank. Please revert back to me with all relevant information, options, and
If you have an older toilet, a faulty fill valve can cause it to leak, wasting water and money. O.D. Always check a projects degree of difficulty before getting started. If your toilet is having other problems, watch our video Diagnosing a Leaky Toilet to figure out which component inside the tank might be leaking. Thomas Smith vipHomeLink may receive compensation from any purchases that are made by our users. your company credit application form alongside with the quote price for It's a good idea to turn off your main water valve, as well. The new fill valve will go on similar to how the old one came off. (If you dont have a bucket, then grab a towel you can throw away or bleach. One of the most frightening noises in your bathroom is the sound of your toilet not filling properly. Holding the fill valve with one hand, use the other hand to thread the mounting nut onto the tailpiece from below the toilet. So now, my dears, the first phase of your vanity project becomes Replace a Shutoff Valvewhich means youll have to be prepared to have the all the water in your house shutdown for several hours. If you have an older toilet, a faulty fill valve can cause it to leak, wasting water and money. All this talk about shutoff valves if only I could replace my shutoff valve, the one that controls my menstrual flow, because apparently its broken in the open floodgate position. Procurement Dept. Ideally, the top of the fill valve should be slightly taller than the top of the overflow tube but not so tall that it will prevent the tank lid from closing. However, you do need a few parts, a couple of tools, and a little bit of effort. To determine the exact replacement, you will need to remove the old valve and bring it to your hardware or plumbing store to determine the right size and type of valve. While holding it in place, use a tape measure to see if the valve is set at the proper height in relation to the overflow pipe.
Sitemap 8
toilet water supply valve replacement
![]()
toilet water supply valve replacement

toilet water supply valve replacement
