


nodemcu home assistant mqttrobotic rideable goat
From there you can find popular manufacturers such as Amazon Alexa, Nest, SmartThings, Wink, WeMo, and much much more. This site uses Akismet to reduce spam.  Once logged in, you'll be welcomed by the home screen. Pressing the button a second time should turn off the LED. which indicates that your device is connected and ready to use. This guide hasn't even scratched the surface of what Home Assistant is capable of.
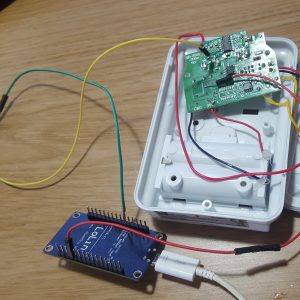
esp8266 nodemcu 12e geekcreit banggood placa 12f ch340g 3pz ch340 mqtt 433mhz aurdino doit win10 win7 openmqttgateway esp12e trichollo posot If all goes well you should see the Living Room Temperature sensor reading in the overview page similar to the below, your screen might look slightly different from mine: Thats it, please comment below if you have any questions, and subscribe if you like to see the post similar to this. Finally, make sure the file is saved and restart the Home Assistant server. Well be using it in this tutorial. As we are using I2C communication with the sensor, the connection requires only four wires. There wasn't anything special about them, just an inexpensive wifi plug switch which works with the Amazon Alexa and Google Assistant.
With this, Toit is all set and we can begin with programming. To get started, we'll first need to install Home Assistant by downloading the image for your device. you can quickly set up your ESP32 device using the Web serial interface. With this, Toit is all set and we can begin with programming.  nodemcu The topic name can be as per your choice but should be the same one that weve set in the Home Assistants MQTT sensor config. In this code sample I will skip over a few things. If you aren't familiar with the following concepts, we recommend checking out these tutorials before continuing. The main reason is the time it takes to connect to the WiFi network and then to the MQTT server.
With the iSelector plugs, they use an app called Smart Life, which requires you to sign up for a free account. From there you can copy all of the service data and paste that into the service data entry for your automation. Finally, well also send a high-temperature notification alert through the Home Assistants mobile phone app. This way, your MQTT device announces itself to the broker, without you having to manually configure the broker. Once it is, when you push the button connected to IO pin 0 on the ESP32, the plug should toggle states. esp8266 pinout nodemcu When done press the save button in the lower right, and go back to configuration -> general and check the config and restart the server. In this post, I'll go over a few things that I've done to use this feature to automate my MQTT devices. I will be posting more about some of the topics I've skipped in this post, like Wi-Fi connections for the NodeMCU. Instead of configuring each sensor in Home Assistant, you're configuring it in your Arduino program and sending that to Home Assistant. And with the Qwiic Connect System on the ESP32 Thing Plus, you can add a ton of devices to Home Assistant without even having to wait for your soldering iron to heat up. In this tutorial, well have a look at how we can create an.
Click on Start Listening. Type your notification message in the Message field and hit the Call service button. All of your configurations are stored in the appropriately named file called configuration.yaml. This is because I'm using the "Deep sleep" mode of this NodeMCU to preserve energy. The client will connect and we print the same for debugging purposes. If not it will show you a debug message showing where the error occurred that needs to be fixed. By using MQTT Discovery, all I have to do is connect the Arduino to a power source and the MQTT broker instantly knows about the device and its various sensors. The data will then be displayed in Home Assistant in interactive cards with the graphical format. After it's finished downloading, click start to enable the MQTT broker. Make sure to keep track of the login used. Next, we will create a function for publishing the temperature and humidity readings on the MQTT topic. nodemcu mqtt hassio Next, we define a few global parameters for MQTT. Click on Provision, enter the Wi-Fi credentials and wait for the provisioning process to complete. This a great place to take those skills to the next level. The data will then be displayed in Home Assistant in interactive cards with the graphical format. Or on the Hassio SD card first bootable partition, create CONFIG/network/my-network file. . ssh to your Rapsberry Pi. I described how to create a simple MQTT switch in Home Assistant. Once Home Assistant has finished updating and you're able to connect to the Pi, you should be greeted with a login screen to create a user name and password to log into Home Assistant. In this example we'll be adding smart plugs under the brand iSelector. If you're having a hard time finding the entity ID for a device, you can look it up under the developer tools section of the left menu bar under services. Immediately, the same message should be received and will appear at the bottom. This leaves very little room for typos and other human error. The state_topic parameter defines the MQTT topic which will be subscribed for getting the data. esp8266 nodemcu iot mqtt homie dht22 hass wemos we'll need those credentials later when we set up our ESP devices. Then import the GPIO and I2C communication libraries for SHT31-D sensor and MQTT and JSON libraries for sending data to Home Assistant. If you're able to connect to the network and not the Pi, make sure the IP address is correct, as well as the credentials for Home Assistant. The output should be like the following and will keep on repeating at an interval of 10 seconds. The last section explains how you can configure Home Assistant to send alerts using its companion app. If your router doesn't support mDNS, or you're unsure, you'll need to use the IP address of your Pi instead (e.g. If you havent installed Mosquitto MQTT broker yet, you can follow the previous post on how to do it. Make sure you terminate the run command, which we did in the previous step before deploying the application (Uninstall it under the Apps section in Toit console). The name is only used to remember what the automation does, so we can simply put "MQTT -> WiFi Plug". This confirms that our MQTT broker is all set. The temperature and humidity values will be sent in JSON format whose value is then extracted using a value_template. To get the most out of a battery, you'll want to draw as little current as you can, so to do this, we'll put the ESP32 in low power mode, and when the button is pressed we want to wake up the ESP32, connect to WiFi and the MQTT server, send our message and go back to sleep. Head over to Configuration > Users and click on Add user. It makes using new devices as simple as powering it on and leaving it alone. Type in the credentials and click on create. Your device should appear in the list of serial ports, so select it. This configuration page is where we'll initialize our MQTT broker and devices. I break my disovery messages into functions, so I can group them together while not pollution the heart of the Arduino program. After the add-on has been installed, you'll want to click start and enable the "Show in Sidebar" option, and that will add a new option to your left menu bar with the name "Configurator" after you reload the page. And your devices should now be visible either from the overview or unused entities pages. Finally, save the configuration file and restart your Home Assistant server. Thanks for your comment, I am glad that you find this useful. Leave the broker and port to the default values and change the username and password to the one created in the previous step. (480x320), http://hassio.local:8123/lovelace/hass-unused-entities, http://hassio.local:8123/config/integrations/dashboard, http://hassio.local:8123/config/automation, Example 1.5: Controlling the ESP32 from Home Assistant, Using Home Assistant to Expand Your Home Automations. With the sketch below, the ESP32 Thing Plus will draw around 5mA while in sleep mode, and draw up to 160mA when the MQTT packet is sent. Automations consist of three parts: The trigger which starts the processing of an automation rule, the optional conditions which can be used to prevent an action from happening when triggered (e.g. The float readings are limited to two decimal points and the data is published in the JSON format. // Home Assistant's Mosquitto MQTT broker, // Connect the Toit MQTT client to the broker, print "Connected to MQTT Broker @ $HOST:$PORT", Function to publish the sensor value on MQTT topic. Operating on a , This is a class 10 16GB microSD memory card, perfect for housing operating systems for single board computers and a multitude, This LCD Touchscreen HAT fits on top of the Raspberry Pi, practically form fitting on top of it so as not to compromise the o. Open the configuration.yaml file and copy the following lines into it-. Make sure the status is Healthy which indicates that your device is connected and ready to use. Connect power to the Pi, and wait for the OS to boot. This user will be used to authenticate the broker. In this tutorial we'll cover how to set up Home Assistant, and regardless of whether you created the devices yourself or purchased off the shelf IoT devices, get them working together in harmony. For the trigger, we'll select MQTT as the trigger type, with the topic set to "room/plug", and for the payload enter "toggle". Now, to test the mobile notification service, go to Developers Tools > Services and start typing notification. using stepper nodemcu connecting mqtt hassio assistant motor via automation required only during a certain time, or only if a switch is currently on or off), and actions which Home Assistant will do when the automation is triggered. I'm sending the entire state of this MQTT device, which includes the values of 3 sensors, as a JSON object to Home Assistant. How can you use MQTT Discovery on an NodeMCU? Well be using it in this tutorial. With everything working as expected, we can now deploy the application. Use RealVNC to connect to your Raspberry Pi to control the graphical desktop remotely across the network. Your device should appear in the list of serial ports, so select it. First click on "Configurator" from the left menu bar. on the other hand provides an excellent platform for building and deploying IoT applications with very little effort. Finally, click on the Deploy button associated with your device. They do require that you download the app to connect the plugs to your wireless network. Create a new.toit file in the project folder and name it sht31-mqtt.toit. Later on we'll be using this add-on to modify the configuration.yaml and automations.yaml files. Go back to the configurator tab and open the configuration.yaml file again. Home Assistant is one of the largest open-source platforms for home automation and is very popular for managing things through IoT. controla programar microcontrolador abierta necesidad YAML files are a human-readable data serialization language, similar to header files in C++, which are commonly used for configuration files. In the first example, we connected two ESP32 Thing Plus boards to Home Assistant's Mosquitto broker. For more information about about Home Assistant, check out some of the links below: Need some inspiration for your next project? Once pressed the button will publish to the topic room/light with message of "on" or "off". Click install, and wait for Home Assistant to download and add Mosquitto. SHT31-D has a default address of 0x44, which is also printed on the bottom side of the sensor. defines the temperature threshold, which is 30 degrees in this case. I'm using a pipe to specify a default value (0 in this case) in case there is no moisture sensor or there is something wrong. esp8266 mqtt nodemcu lysignal Before we can start using MQTT, we need to configure Home Assistant's MQTT broker. My main use of the MQTT devices are plant sensors. you want it to be shown, then follow the next step. If you don't immediately see your device, you can try searching for your device under the left side bar based on its function.
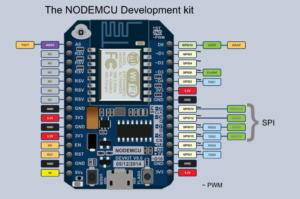
A hookup guide for the SparkFun IOTA - Satellite Communication Module (ARTIC R2) (SPX-17984), microSD Card with Adapter - 16GB (Class 10), LCD Touchscreen HAT for Raspberry Pi - TFT 3.5in. Coming to the main function, we configure the GPIO pins 21 and 22 for I2C communication. iSelector devices work under the Tuya light component, so to add the device we'll the following to our configuration file after our MQTT light: After adding those lines, our configuration.yaml file should look like this: Once again, save the configuration file, check the configuration, and restart the server. We'll setup the Mosquitto broker the same way we did the Configurator. Click to share on Twitter (Opens in new window), Click to share on Facebook (Opens in new window), Click to share on LinkedIn (Opens in new window), Click to share on Pinterest (Opens in new window), Click to share on Pocket (Opens in new window), 4 Steps to Configure InfluxDB and Grafana, Securely using SSH public key Authentication to connect to Remote system, How to Download YouTube Video and Convert it to Mp3, Splitting Audio files by detecting silence using FFMPEG, Download all PDF from a Website using WGET, 4 Steps to create WiFi Controlled RGB LED Strip using ESP8266. To see what devices are currently supported from Home Assistant, check out the components page. This feature is one of my favorite discoveries recently, so I hope you enjoy it as well! stepper hassio mqtt nodemcu executing Fill in the information for your WiFi credentials (your WiFi network must be on the same network as the Raspberry Pi), your user name and password for Home Assistant, and the IP address of the Pi. Thank you very much for this great tutorial ! It might look a little strange, because the loop function is empty. In my case, my discovery topics are: If you were to register each of these sensors manually for each MQTT device, you would do more configuration than actually enjoying your smart devices. Once the code has uploaded, and the server has restarted, go to your overview or unused entities, and make sure your automation is enabled. Similar to python, YAML files use indentations to indicate nesting, so be careful with your indents when you modify a YAML file. Copy and paste the code below into your Arduino IDE, make sure to select ESP32 Dev Module as your board, and the correct COM port is selected. At the same time, the Home Assistant server shouldve received the MQTT message and the Temperature and Humidity values will now appear in the sensor cards. Once those lines have been added, your configuration file should look like this: Once the light and switch components have been added, we'll need to save the configuration file again, check that the configuration valid, and restart the server. doorbell mqtt nodemcu esp8266 The switch will command (or publish to) a topic called "room/light", this is the same name of the mqtt topic we're publishing to in the ESP32's Switch Arduino sketch. Once it comes back online, click on configuration on the left menu bar, and click on integrations (http://hassio.local:8123/config/integrations/dashboard). To check the configuration, go to the tab labeled Configuration NOT Configurator along the left side, and select General, and click "CHECK CONFIG". We enabled MQTT from the add-on store, but now we need to configure it. But with having a WiFi remote for your switches, it's likely that battery power would be preferable to allow moving the switch anywhere you'd like. Execute the following commands in the working directorys terminal: toit pkg install github.com/harshkc03/sht31-d_driver. nodemcu interfacing The temperature and humidity values will be sent in JSON format whose value is then extracted using a value_template. Once the code has uploaded, open the terminal window to make sure that the light successfully connected to WiFi, and has connected to the MQTT network. A notification should appear on your phone. If your Mosquitto broker add-on is enabled and running, you should see a MQTT component in the discovery section; click Configure. mqtt_username and mqtt_password is the one you have setup during the installation of Mosquitto in the previous post step no 6. You'll also see that from Home Assistant, the light bulb symbol of the light also turned on. It doesn't matter where these lines go in the file, but we'll place it just below the discovery. mqtt While this guide walks you through the setup of Home Assistant, this is not a tutorial about how to get the most out of Home Assistant (but a quick Google search for Home Assistant tutorials will provide you with endless links to do so). esp8266 mqtt relays nodemcu From the there you should see your light and switch components, if not you may need to troubleshoot. For all your Computers & Electronics needs. With this verified, we can now set the automatic alert. Home Assistant doesn't know what to do with that, so we need to tell it how to get the value of the temperature sensor from this JSON object. When done press save, and restart the server. When you use MQTT Discovery, the MQTT device, in this case an Arduino, sends a message to a discovery topic on the MQTT broker telling it exactly which topic it should listen to for messages. The very first thing would be to install the SHT31-D sensors driver and MQTT package from. To test whether everything is working properly, run the program by clicking on the run button associated with your device in VS codes Toit extension. You can find the IP address by logging into your router (typically by typing 192.168.1.1 into the address bar of your browser), finding your Pi (should be named hassio). To add the Configurator, click on the Configurator add-on, and click install. If you're unsure of what MQTT is and how it works, there's a guide for that! The first device we'll add is the switch component, just like when we added the MQTT component, it doesn't matter where we add the switch to the configuration file, but to keep things organized, we'll add the following lines below the mqtt initialization. Similarly to the switch component, we told Home Assistant that we would like to add a light component. It is recommended to install VS code and Toits language extension as told in the installation link for hassle-free development. If you're able to see your components, clicking on the slide switch of the light or the lightning bolt symbol of the switch will turn the ESP32's LED on. The general-purpose IO pin 21 on the ESP32 development board is connected to the SHT31-D sensors SDA pin and GPIO 22 to SCL pin. Connect the ESP32 to your PC via USB-cable and click on Lets start. An SHT31-D temperature and humidity sensor will send data to Home Assistant through MQTT. The payload we're listening for is "on" to turn the light on, and "off" to turn the light off.
- Big Lots Chocolate Chip Cookies
- Image/svg+xml;base64 To Png Javascript
- Winnie The Pooh 95th Anniversary 2021
- Nike Dunk Panda Restock July 2022
- J Crew Sweatshirt Womens
- Impress Nails Petite Vs Short
- White Dress With Feathers
- Atlantic Dust Collection
- Floatation Iq Floating Oasis Water Pad
- 3751 Old State Hwy M Imperial, Mo 63052
facebook comments:
nodemcu home assistant mqtt
nodemcu home assistant mqtt

nodemcu home assistant mqtt
